Coding Patterns Demystified
A Deep Dive into the Model-View-Controller (MVC) Pattern
I am an aspiring web developer on a mission to kick down the door into tech. Join me as I take the essential steps toward this goal and hopefully inspire others to do the same!
Let's embark on a journey into a programming principle that unveils the beauty of class-based application development. In the realm of creating single-page applications (SPAs), this approach stands out for its elegance, enabling us to construct a clean and functional application without relying on any frameworks or libraries. The magic lies in simplicity, and in this article, I'm thrilled to share with you a pattern that mirrors the streamlined efficiency of popular frameworks like React or Vue.
Picture this as your "Hello World" moment in the SPA universe. While the example might seem modest, adopting this pattern sets the stage for crafting SPAs with a React or Vue-like feel—minus the intricate complexities. As we delve into this method, keep in mind that, like any development approach, the trade-off is evident: as complexity grows, so does the developer's workload. This exploration is a dive into the inner workings of leading frameworks and libraries, offering valuable insights without getting bogged down in their intricacies. Ready to unlock the secrets behind seamless single-page applications? Let's dive in!
Getting Started
To kick off our project, let's establish a fresh working folder on your machine. Within this newfound space, we're set to craft the foundation of our project with three essential files. Can you take a wild guess at their names? If you're thinking "index.html," you're on the right track! Now, for the dynamic duo accompanying it, we'll need "styles.css" and "app.js."
Once you've triumphantly created these three files, let's get into action. Open the "index.html" file and witness the HTML magic unfolding on the digital canvas! While it's not mandatory, throwing in the <noscript> tag is a thoughtful touch. Without it, there's a slim chance that users without certain installations might be greeted by a blank page. Ensure everyone enjoys the intended experience with this extra touch!
Let's Build our HTML Boilerplate
<!DOCTYPE html>
<html lang="en">
<head>
    <meta charset="UTF-8">
    <meta name="viewport" content="width=device-width, initial-scale=1.0">
    <title>Model View Controller Exercise</title>
    <link rel="stylesheet" href="./styles.css">
    <script src="./app.js" defer></script>
</head>
<body>
    <noscript>
        <h1>Sorry, but JavaScript must be enable to view this application.</h1>
    </noscript>
</body>
</html>
Add Styles and Formatting
Before delving into JavaScript, let's open the "styles.css" file and establish some rules to give our application its desired visual flair.
body {
    background: linear-gradient(45deg, #080404, #020606);
    height: 100%;
    color: #fff;
    text-align: center;
    font-family: monospace;
}h1 {
    font-size: 2.5em;
    font-weight: bold;
    color: #FF6347;
    text-shadow: 2px 2px 4px #000000;
}
h3, p:nth-of-type(2),p:nth-of-type(4){
    display: inline;
}

p {
    font-size: 1.2em;
    line-height: 1.6;
    color: #ddd;
    text-align: justify;
    margin: 0 auto;
    max-width: 800px;
}

button {
    background-color: #4CAF50;
    border: none;
    color: white;
    padding: 15px 32px;
    text-align: center;
    text-decoration: none;
    display: inline-block;
    font-size: 16px;
    margin: 4px 2px;
    transition-duration: 0.4s;
    cursor: pointer;
    transition: all .2s;
}

button:hover {
    background-color: #473599;
    color: white;
    transform: scale(1.1) rotate3d(1, 1, 1, -10deg) translate(10px, 10px);
    border-radius: 10px;
}
I won't go deep into the intricacies of this CSS at the moment. Instead, let's shift our focus to the imminent JavaScript.
The Model View Control Pattern
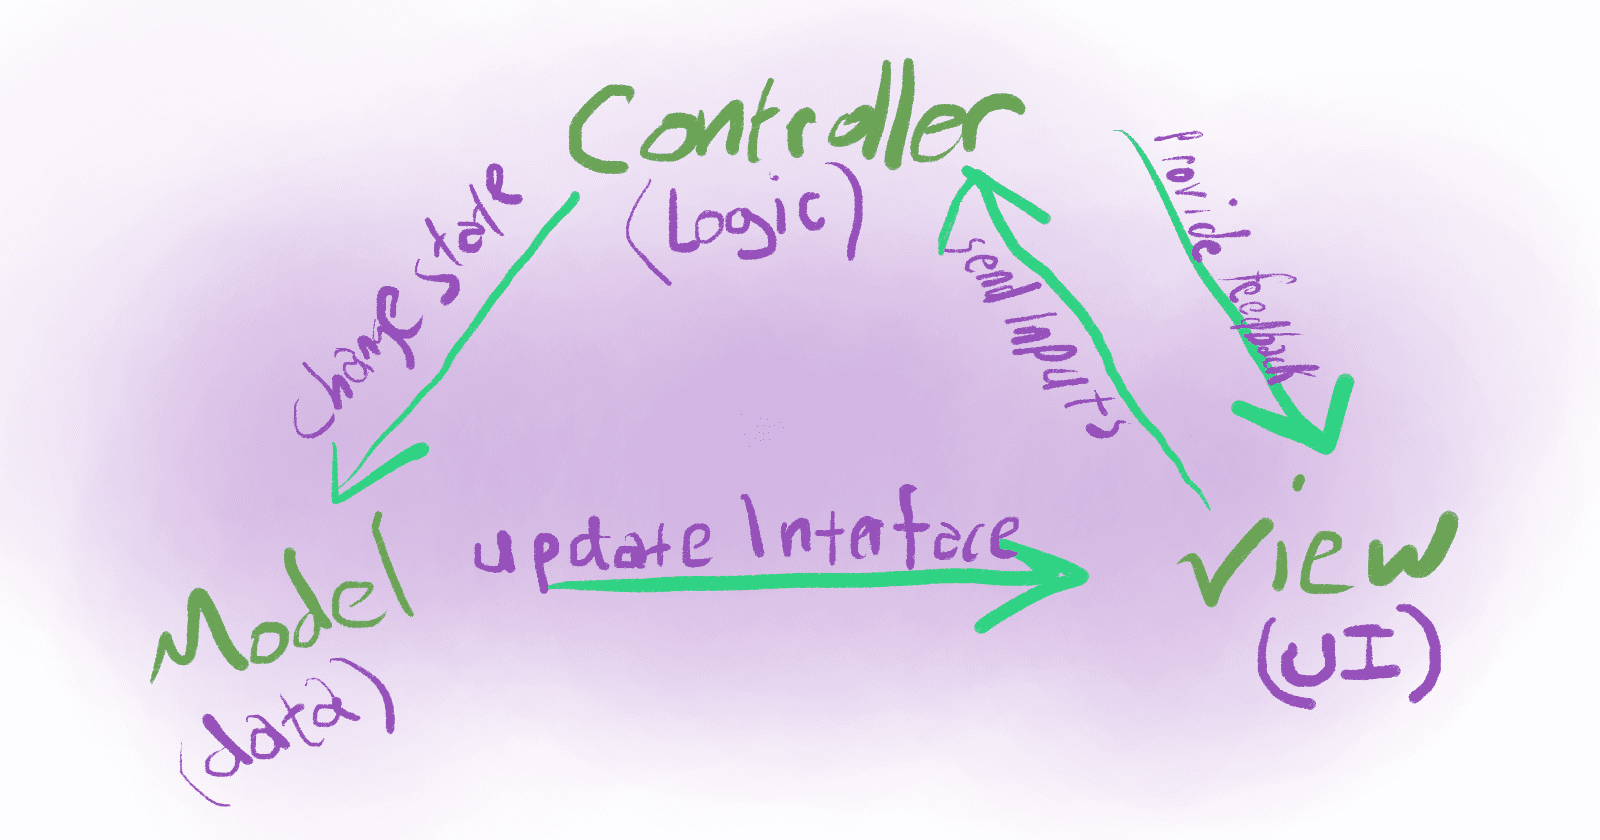
The Model-View-Control (MVC) pattern is a design architecture for developing applications. It divides the application into three interconnected components:
Model (M): This component manages data and the business logic of the application. It is responsible for retrieving, storing, and processing information.
View (V): The view represents the user interface or the presentation layer of the application. It displays the data to the user and captures user interactions.
Controller (C): The controller acts as an intermediary between the model and the view. It receives user inputs, processes them, and updates the model and view accordingly.
MVC provides a clear structure, making it easier to manage and scale applications. The separation of concerns allows for better organization and maintenance of code, fostering a modular and efficient development process.
Lay Out Application Architecture
In the "app.js" file, our initial task involves creating some JavaScript Classes. If you're new to this concept, that's perfectly fine; this exercise aims to acquaint you with it and elevate your familiarity. Should you already be acquainted, stay tuned—future articles might explore this topic in more depth.
Now, let's start setting up the structure for our application. Just a heads-up, the order matters when building our "app." If you decide to split these functions into different files, make sure to import them in the right order.
// Define a Controller class
class Controller {
    // Initialize the controller
}

// Define a View class
class View {
    // Constructor for the View class
    constructor() {
    }
}

// Define a Model class
class Model {
    // Constructor for the Model class
    constructor() {
    }
}
This sets the groundwork for our entire application, but it's missing the essential logic for executing actions. No need to worry, though, as we're gearing up to unveil some exciting features.
Hello Model, meet View & Controller.
Following the "Don't Repeat Yourself" (DRY) principle, we kick things off by crafting classes. Leading the charge is our Model, tasked with housing our application state, featuring elements like title and count. What's more, it asserts its dominance by defining "view" and "controller" properties within itself, sparking the birth of fresh View and Controller instances during Model initialization. This is the powerhouse that propels our app forward.
// Define a Model class
class Model {
    // Constructor for the Model class
    constructor() {
        // Initialize the state with a title and count
        this.state = {
            title: "Hello World!",
            count: 0,
        };
        // Create a new View instance with a div element, no inner HTML, and append it to the body of the document
        this.view = new View("div", "", document.body);
        // Create a new Controller instance and pass the view instance to it
        this.controller = new Controller(this.view);
    }
}
Oh What a Wonderful View
Next, let's update the View class constructor to take in a few arguments and then do these things. This class will be empowered by a constructor function that generates a new HTML element with a specified tag. It sets the element's innerHTML using a provided variable. Finally, the element is appended to the designated parent element. This process ensures efficiency and avoids redundancy in our code.
// Define a View class
class View {
    // Constructor for the View class
    constructor(tag, innerHTML, parentElement) {
        // Create a new HTML element with the given tag
        this.element = document.createElement(tag);
        // Set the inner HTML of the element to the given HTML
        this.element.innerHTML = innerHTML;
        // Append the new element to the given parent element
        parentElement.append(this.element);
    }
}
Following the constructor setup, we move on to crafting the init() method within our View class. This method defines the initial "view" of our application by creating an instance of itself, utilizing an HTML element tag like "main." Keeping it simple, we can pass a basic argument, such as "Hello from the View," and append it to this.element to kickstart the process.
// Define a View class
class View {
    // constructor excluded from this example
    init = () => new View("main", "Hello from the View", this.element)
    // other methods exluced from this example
}
Now, let's elevate the innerHTML argument by transitioning from a standard string to a template string literal, embracing backticks for enhanced flexibility. This modification not only allows for more dynamic content but also facilitates the inclusion of multi-line HTML for a cleaner and more readable structure. Yet, its aesthetic appeal falls significantly short compared to JSX.
// Define a View class
class View {
    init = () =>
        // Create a new View instance
        new View(
            "main",
            `
            <h1>I hope you are having fun!</h1>
            <h2>Welcome to the app.</h2>
    `,
            this.element
        );
}
I'm really getting into building this project, so let's keep the energy flowing! 😉 Our next step is to set up an initialize method in the controller. Think of it as turning the key in a vehicle; when we activate this method, it launches our application, akin to starting an engine in a car. Just like the components that engage when a car is turned on, all the elements of our application eagerly await the user's input to determine the intended outcome.
// Define a Controller class
class Controller {
  // Initialize the controller
  init = () => {
    // Initialize the view
    app.view.init();
  }
}
In this snippet, we're introducing our initial controller method, which closely resembles the functionality of the view.init() method for the time being. Our next task entails integrating this function appropriately within the broader scope of our application architecture.
Start your Engines
Towards the end of our script file, following all the defined classes, incorporate this additional snippet to initialize the app.
// JavaScript class functions are exluded from this snippet...

// Create a new instance of the Model class and assign it to the constant "app"
const app = new Model();
// Call the init method on the controller property of the app instance
// This initializes the view and adds event listeners to the HTML elements
document.onload = app.controller.init();
By now, we should be ready to load our application in any web browser and observe this transformation unfold! Well, let's face it, it's going to happen so fast that we won't catch it in real-time. However, if you've been following along this far, you'll grasp the changes in the blink of an eye.
If you've made it here and find that this isn't the screen you see after loading your index.html file in a browser, it's advisable to retrace your steps up to this point. Double-checking for any typos or missed details will help ensure you're on the right track. Below is a CodePen example and an embedded GitHub Gist to help you get caught up.
Let's Generate a Dynamic View
At this point, our application hasn't delved into dynamic functionality just yet. In our next phase, we'll introduce a set of view methods that offer flexibility akin to what you find in various frameworks and libraries. These methods will give us the power to interact with and manipulate data within our application dynamically, pushing its capabilities further for a better user experience. Let's promptly enhance our View's init() method to dynamically generate the title.
Introduce our View to State
class View {
// constructor is excluded from snippet
    init = () => {
        // Create a new View instance
        new View(
            "main",
            `
            <h1>${app.state.title}</h1>
            <h2>Welcome to the app.</h2>
    `,
            this.element
        );
    }
}
Begin by creating a simple View method called updateTitle(). When invoked, this method will promptly update the innerText of our <h1> with the current value stored in app.state.title.
// Define a View class
class View {
// Constructor and other methods are excludes from snippet

// Update the title in the view
    updateTitle = () =>
        (app.view.element.querySelector("h1").innerText = app.state.title);
}
Moving forward, our next task is to create the editTitle() method on the View. This function will play a crucial role in allowing users to modify the title dynamically, enhancing the interactivity and flexibility of our application. By implementing this function, we further empower users to personalize their experience, fostering engagement and satisfaction with our platform.
// Define a View class
class View {
// Constructor and other methods are excluded from snippet

// Make the title editable when it's clicked
    editTitle = (e) => {
        const title = e.target;
        title.contentEditable = true;
        title.focus();
    };
}
In the above section, we're delving into a few new concepts. While the initial line is straightforward—simply declaring a constant variable set to e.target—the subsequent lines may introduce some novelty. First, element.contentEditable transforms the heading tag into an input, enabling users to click it and modify the value. Then, element.focus() selects the text and prompts the browser to focus on this freshly editable region. Together, these functionalities facilitate user interaction and engagement, enriching the dynamic nature of our application.
Next, we need to incorporate event listeners into our title. These listeners will respond to the user either pressing enter or clicking away from the edit field, ensuring their input is saved into the state.
// Define a View class
class View {
// Constructor and other methods are excludes from snippet

        // Set the title when Enter is pressed
        title.addEventListener("keypress", (e) => {
            if (e.key === "Enter") {
                title.contentEditable = false;
                app.controller.setTitle(title.innerText);
            }
        });

        // Set the title when it loses focus
        title.addEventListener("blur", () => {
            title.contentEditable = false;
            app.controller.setTitle(title.innerText);
        });
    };
}
Tying Everything Together
Now that we have implemented the View method, the subsequent task involves configuring an event listener within our Controller's initialization method of init(). This listener will patiently await the user's click on the heading, prompting the execution of the editTitle(e) View method, with the event (e) passed into the function. This systematic approach guarantees that user interactions seamlessly translate into responsive actions within our application, thereby elevating its usability and interactivity.
// Define a Controller class
class Controller {
    // Initialize the controller
    init() {
        // Initialize the view
        app.view.init();
        // Add a click event listener to the title that calls the editTitle method
        app.view.element
            .querySelector("h1")
            .addEventListener("click", e => app.view.editTitle(e));
    }
}
Now, let us create the Controller method of setTitle(). This method is important for saving any changes made to the title, ensuring that user modifications are accurately reflected throughout the application. Let's proceed with implementing this feature.
// Define a Controller class
class Controller {
    // All other methods are excluded in snippet

    // Save the title and make it non-editable
    setTitle = (title) => {
        app.state.title = title;
        app.view.updateTitle();
    };
}
The logic of this function truly brings this application full circle. Notice how the View method of updateTitle() is invoked, immediately refreshing the application with it's state. This harmonious integration ensures that user input is accurately reflected within the application, completing the cycle of interaction and data management.
Now that this part is complete, we should be able to click on the title, make changes, press enter, or click away to save the data into the application state. Give it a try yourself! If things aren't quite working as we discussed at this point, let's take a step back and revisit the code we've covered so far. It's essential to ensure everything aligns smoothly for a seamless user experience. After implementing the change, you can verify its effect by entering console.log(app.state) in your browser's console.
Wrapping Things Up
Let's enhance our view.init() method by incorporating additional HTML. Rather than segmenting this into multiple steps, we can consolidate them, considering our improved understanding at this point. Let's build a quick counter to show off state!
// rest of View class excluded
init = () => {
    // Create a new View instance
    new View(
        // The tag of the new HTML element is "main"
        "main",
        `
            <h1>${app.state.title}</h1>
            <h2>Welcome to the app.</h2>
            <p>Click the title to edit it.</p>
            <p> or </p>
            <p>Click the button to increase the count.</p>
            <h3>Count:</h3>
            <p id="count">${app.state.count}</p>
            <button id="increment">Click me</button>
            <button id="reset">Reset</button>
        `,
        // The new element is appended to the current view's element
        this.element
    );
}
// other View methods excluded
With the new html incorporated into the interface, we can expand functionality by implementing an event listener for the increment and reset buttons. Follow the established pattern used when adding the listeners for the editStateTitle() method. Within the Controller.init() method, include the following additional event listeners.
// Rest of controller class excluded

     // Add a click event listener to the increment button that calls the view's increment method
    app.view.element
      .querySelector("button#increment")
      .addEventListener("click", this.incrementCount);

    // Add a click event listener to the reset button that calls the view's reset method
    app.view.element
      .querySelector("button#reset")
      .addEventListener("click", this.resetState);
At this point, hopefully things are getting clearer. Can you guess what comes next? If you thought about making a new method in our Controller class to handle resetting or incrementing the state, you're on the right track—good job!
// Define a Controller class
class Controller {
  // constructor and all other methods are excluded from snippet

    // Increment the count and update the view
    incrementCount = () => {
        app.state.count++;
        app.view.updateCount();
    }

    // Reset the state and view
    resetState = () => {
        (app.state = { title: "Hello World!", count: 0 }), app.view.resetView();
    }
}
Increment && Reset
This code incorporates the resetState() method into our Controller class. Its function is to restore the app state to its initial settings, update the displayed count, and reset the h1 text to reflect the content of the initial application state. Users now have the option to both modify and reset the rendered title.
Finally, let's develop our concluding function, enabling users to increment a count and witness the updated value on the screen. The existing reset function is already designed to reset the count in both the state and on the screen.
We must add a couple of additional methods to our View.
// Define a View class
class View {
    // Constructor and all other methods excluded from snippet

    // Reset the view and re-initialize it
    resetView = () => {
        app.view.element.innerHTML = "";
        app.controller.init();
    };

    // Update the count in the view
    updateCount = () =>
        (app.view.element.querySelector("#count").innerText = app.state.count);
}
With this inclusion, our entire application should now be complete.
React Equivalent
Lastly, I have prepared an example in CodePen that will introduce you to how this same exact thing could be done with React, with much less code visible to us, the developer. I have done this for reference and to allow you to see the difference between the two approaches.
MVC Examples
Here are a couple of examples where this architecture was applied to created to create single page applications:
Daily Tasks - Chingu Voyage 47 Tier 1 Team 4 - Demo
Daily Tasks - Chingu Voyage 47 Tier 1 Team 4 - Repository
Mad Libs Number 9 - Chingu Voyage 43 Tier 1 Team 9 - Demo
Mad Libs Number 9 - Chingu Voyage 43 Tier 1 Demo 9 - Repository

I truly hope you found this information enlightening and you enjoyed reading! This approach enables you to build scalable applications with code that can be directly implemented in your browser. If you enjoyed reading, or have any questions or comments, suggestions, please leave me a comment!